How To Install Stone Veneer over a Concrete Wall
Learn how to plan the layout, choose materials, and cut and fit the rocks for a beautiful, durable stone facade.
Synopsis: Making a rock wall is easy, right? Lay down some mortar, put a rock on it, and then keep doing the same thing all day and you’re done. But that’s not the whole story. In this article, North Carolina stonemason Cody Macfie guides us through the tough parts — manipulating a stone to fit a particular spot, making space to work, and making the right mortar recipes. A design gallery and materials list including cost information will help you plan your project.
In the old days, foundations of rock or brick werethe norm. They looked good and were fairly easy tobuild. Nowadays, concrete block or poured concreteis the foundation method of choice because they’re muchfaster to build. This newfound speed, however, comes atan aesthetic cost: Concrete is ugly. But you can make aplain-looking block wall into a great-looking rock wallby veneering it with fieldstone. The tools and materialsneeded are few, and the payoff is huge.
The techniques for veneering are the same for block,poured concrete, or even a wood-frame wall, as are the要求。Make sure you have sufficient supportbelow the stone (a solid footing), and attach the veneerto the wall with wall ties. If the veneer is a retrofit, youmay need to pour an additional footing, usually about6 in. wide. And for wood-frame walls, you need to adda moisture barrier, such as peel-and-stick roofing membrane or #30 felt paper, to the wood. Wall ties are easy toinstall if you’re laying up a new block wall. For concretewalls or existing block walls, the ties can be attached witha powder-actuated nail gun or with masonry screws.
Although veneering an entire house is best left to aprofessional, a short foundation veneer, such as the onefeatured here, is certainly bite-size enough for a non-mason to attempt.
Tight-fitting, yet unmanipulated
There are as many varieties of stonework as there arestonemasons, but most can be lumped into a few patterns
(sidebar facing page). Much of my work is in a style calleddry stack, which resembles a traditional no-mortar rock
wall. When veneered in the dry-stack style, mortar ispacked behind the stones as well as in a thin layer aroundthe stones, but the mortar is not visible. While dry-stackveneer looks rough and tumble, it’s rather precise. Thestones fit together tightly, yet look unmanipulated. Withjointed-style stonework, you don’t have to be as particular because the visible mortar around the stones absorbsthe bumps and irregularities.
Good-looking dry-stack veneer is all about tight jointsthat look natural. You can close gaps between stones bychipping away bumps, by using plugs, or by manipulating the shape of the stone with a hammer and a bluntchisel. Large gaps not only look unnatural but also can allowstones to shift, which creates a weak spot in the wall.
The most important tool is space
Being able to look at all the stones to choose the best size,shape, or face for each particular spot—especially thecorners—is critical. Because stonework is a mixture of artand grunt labor, plenty of space allows you to take inventory and set aside key stones, such as corners and caps,so that you won’t have to switch gears as often. Stoppingthe process of laying up stone to haul another load canbe frustrating.Start by dumping the stone into a large space near thework area, and shuttle small piles to the wall in a wheelbarrow. The other tools you’ll need are a square shovel, a pointing trowel, a mason’s trowel, a 4-ft. level, a brick hammer, a 4-lb. rock hammer, a blunt chisel, a plumb bob, a tape measure, and a garden sprayer. If the job is large, rent a cement mixer.
Before you start, look up and down
Although stone veneer doesn’t support weight, a footingmust support it. Because the footing is below final grade,stacking 6-in. or 8-in. concrete blocks to just below thefinal grade line and laying stones on the blocks makessense. Blocks need to be secure to make a solid seat for thefirst course of stones, so set them in mortar. If dirt has covered the footing, dig it out until the footing is exposed.
Verify that the wall to which you are veneering isplumb. A plumb wall speeds the veneering process because you can simply measure the same distance from the wall to the face of the stone as you lay them. If the wall is not plumb, then use a level to make sure the stone faces are plumb.
Mortar holds the stone together
I measure mortar in batches, or the amount that my mixercan mix, that my wheelbarrow can hold, and that I can
maneuver around the site. A full batch fills my mixer. Imix either a full batch or a half-batch depending on theweather, my crew size, and proximity to quittin’ time.Regardless of whether you use a mixer or a wheelbarrow, the recipe is the same: a 3-to-1 mixture of sand toportland cement. A full batch in my mixer is a half-bagof portland cement and 14 shovelfuls of sand. If you mixin a wheelbarrow, small batches make the mixing mucheasier. Whether mixer or wheelbarrow, mix the dryingredients well before adding the water.
Dry-stack mortar can be mixed a bit wetter than jointedstyle; it should be slightly sticky. To test, take a handful,form it into a loose ball, and throw it into the air. If it staysin a ball, you’re ready to go. If it crumbles and doesn’tstay in a ball, slowly add water. Be conservative. Thereis probably more water in the mix than you realize, andif the mix becomes too soupy, you’ll need to add moresand and cement. On hot days, mix the mortar a littlewet because it tends to dry quickly, especially when sitting in the sun.
A fast-drying variation of this 3-to-1 recipe is to changethe cement mix from 100% portland to half portland and
half type S. Type-S cement is stickier and sets up faster.I use this recipe when I need to be able to build a wallhigher than 4 ft. or 5 ft. in a single day. The stickier mortar adheres well to the stone, and it dries within a coupleof hours.
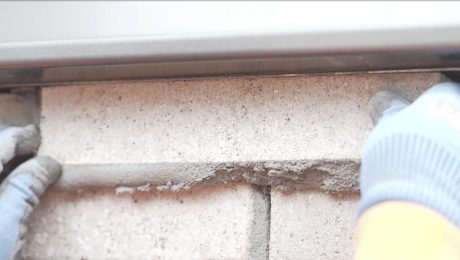
Mortar binds the wall
Lay stone on a bed of mortar and pack morebehind. The unseen mortar below, beside, andbehind the stone holds the wall together, butvisible mortar in front will be scratched out.

|

|

|
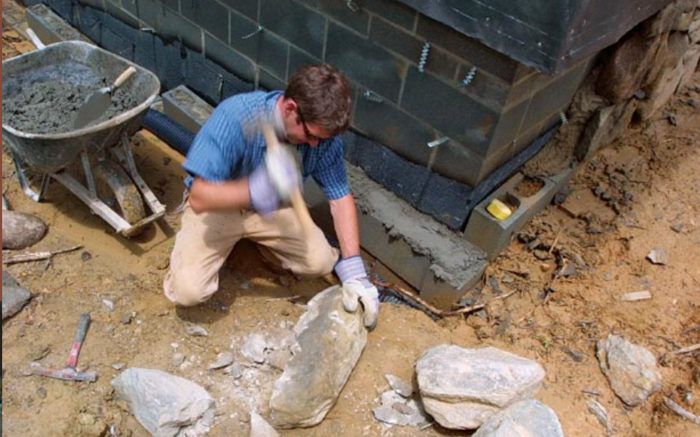
The craft of stonework: cutting and shaping
The difference between a good-looking wall and a monster has a lot to do with your ability to manipulate a rock.The tighter the stones fit together, the neater the overallwall will look. Good masons know how and where to hita stone, then where to place it.
To trim the edges of large stones, use a blunt chisel;keep the brick hammer sharp for trimming the edges ofsmaller stones. If you are unhappy with how the stonelooks on the wall, take it down and trim it the way youwant it, or simply find another stone.
For a rustic look, minimize surface chiseling; don’t trimthe textured faces you want exposed. On this job, thehomeowners wanted an organic, native stone with a lotof texture, natural weathered color, rigid lines, and shadowed indentations, so I left the faces alone. The sides andtops of the rocks, however, aren’t exposed, so I was fairlyliberal in trimming around the edges.
Without surface chiseling, the face of the wall will varysomewhat. I set the face of each stone roughly 6 in. fromthe block wall. Some surface lumps or dimples will be bcloser or farther. The main body of the stone aligns, and the surface irregularities provide texture.
Because cornerstones have two exposed faces, it’s a good idea to choose them first. And because the corners dictate the course lines, that’s where I start. After setting a couple of alternating cornerstones, I lay a long base of horizontal stones before building up. I never build more than 4 ft. or 5 ft. high in one day without using fast-setting (type S) mortar. Portland-cement-based mortar won’t cure enough to hold the weight. When placing each stone, orient it so that the thickest part is on the bottom, which keeps it from kicking out when weight is stacked on top. Make sure the stone doesn’t shift before you fill in with cement. And don’t trim rocks while they are resting on the wall; trimming can loosen surrounding stones before they are set.
Long stones make the wall look stronger
Stones often are packaged in similar shapes: long horizontal stones, nuggets, rounded fieldstones, etc. A pat燕鸥,我喜欢的是20%到40%的混合物字段tonesand 60% to 80% horizontal stones, but the final patternis somewhat dependent on how the stoneyard packagesthe stone. For this job, I bought the stone for the projectin bulk to get a more random selection of rock shapes because the homeowners didn’t want the wall to have a formal pattern. Even for a random pattern, though, I follow a couple of rules.
Rule #1: Always bridge vertical joints with the stones in the next course. Running vertical joints are not pleasing to the eye and eventually can crack if the foundation settles or shifts.
Rule #2: Alternate corners to the left and right as you set each course. Even with a rustic pattern such as this one,
结构要求角落,或大型的角落stones, alternate. Although I didn’t pull strings from the wall ends for a straight corner, I did take care to choose cornerstones with faces at right angles to one another.
Alternate the cornerstones
Because cornerstones have two faces exposed, pick them carefully.To make a corner strong, the stones should alternate directions.Build up the corners, then work sideways into the field.

|

|

|
Cap the wall
Because this veneering project tucks under cantileveredframing, a perfect cap isn’t as critical. However, if a veneer
projects beyond the siding, a flat cap with the same typeof stone gives the wall a finished look and allows it toshed water.
If you know the veneer will need a finished cap, makesure you leave enough room for it. Up to 2 in. more thanthe thickness of the capstones is enough space to anglethe stone away from the house to shed water. Tap capstones with a rubber mallet to set them in position. Makesure the capstones are level. One easy way is to snap achalkline across the wall before you set the last courseof stone.
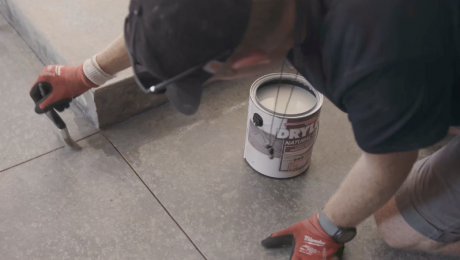
Finish with a brush and a sealer
As you lay the stones, packing mortar behind them to seteach one and to hold the wall ties, some mortar will make
its way to the surface cracks. After a couple of hours ofcuring, scratch away this excess with a small pointingtrowel. The mortar should crumble and fall out. Scratch–ing too soon may smear cement on the edges of the stonesor compromise the integral structure of the hidden mortar bed. With dry-stack veneering, you don’t need to finish the joints, so after scratching out excess mortar, brushthe joints with a small broom.
After a few days, the mortar should be cured fullyand ready for a waterproofing sealer. I like Sure KleanWeather Seal Siloxane PD (www.prosoco.com; 800-255-4255). Waterproofing keeps moisture out of the basementand also prevents efflorescence. Apply sealant to the stonewith a garden sprayer. The most important place to sealis the top of the wall (the cap) because this spot gets themost water.
For more photos and more information on how to build a rock wall including costs, click the View PDF button below.
This article originally appeared inFine Homebuilding magazinetitled “Dress Up a Block Wall with a Rock Wall”